Sunday, June 28, 2015

D.I.Y. - Custom LED Lighting / Engine Bay Lighting - By Richard DeFries

D.I.Y. - Custom LED Lighting / Engine Bay Lighting

1. Gather Your Tools / Parts - 10 ft Wire Loom - Zip Ties - LED Strip Lights - Mini Fuseable Link - 10 ft Red and Black Wire - Wire Strippers - Wire Crimpers - Assorted Wire Connectors

2. Pop Your Hood And Remove The 9 Pop Clips Holding On The Felt Liner - Remove Liner - Perfect Time To Clean Up Under Your Hood Before Install (Ref Pic 1)


3. Run The Wires For Your LED Strips - There Are Pre-Tapped Holes From GM That Work Perfect For This (Ref Pic 2)


4. Find The Best Path To Run Your Wires And Loom What You Have Ran Zip Tie Closed Make Your Connections In The Middle Of The Hood Use 2 Butt Connectors And Electrical Tape Or Heat Shrink Tubes (Ref Pic 3)


5. This Image Is To Give You A Good Idea On Where To Route Your Loomed Wires After You Make A Connection From The Wires Fed Through The Firewall (Ref Pic 4)


6. This Image Will Show You The Best Route To Get The Loomed Wires Into Your Engine Bay Without Crimping Them (Ref Pic 5)


7. This Is All Done Under The Hood And Everything Buttoned Up (Ref Pic 6)


8. Use Your Fuseable Link To Get Power From A Ignition Switched Source - So Once You Turn Your Key For Accessories They Will Light Up - Or You Can  Install A Toggle Switch And Use Your Fuseable Link To Get Power From A Constant Source

9. This Is A Finished Project These Pictures Are Without Flash On And Is During Late Afternoon (Ref Pic 7) 


10. And These 2 Pictures Are At 11 PM With No Flash On In The Dark (Ref Pic 8 & 9)


11. Pop That Hood For A Show And You Can Really See What's Under The Hood At Night - Sit Back And Enjoy Your Hard Work! -  And Thanks To Steve Miller For Showing Me This Mod And Allen Payne For Creating This Mod

Thursday, June 25, 2015

D.I.Y - Lamin - X Tinting Tail Lights - By Richard DeFries

D.I.Y. - Lamin - X Tinting Tail Lights

1. Gather Your Tools / Parts - Phillips Screwdriver - Lamin - X Tinting Kit - Paper Towels - Rubbing Alcohol - Micro Fiber Clothes - Needle - Blow Dryer

1. Pop Your Hatch / Trunk Remove The 2 Screws Holding The Tail Light Fixture Into Place Remove Slowly There Are 2 Plastic Pins That Hold The Tail Light Fixture In Place And The Rubber Grommets They Sit In Tear Easily. Once The Tail Light Fixture Is Free Remove The Wiring Harness From The Tail Light Fixture And Remove The Bulbs.

2. Bring Your Tail Light Fixture Inside And Remove The 8 Screws Holding The Face Plates On (Ref Pic 1)


3. Once The Face Plate And Lense Is Separated Start To Prep Your Tinting Surface I Used Rubbing Alcohol And A Micro Fiber Cloth To Remove Any Debris / Dirt (Ref Pic 2)


4. Mist Your Tinting Surface With The Supplied Water Bottle And Lay Your Tints Down Once You Feel They Are Nice And Centered Use The Supplied Squeegee And Go From The Center To The Edges To Remove The Excess Water. Once You Have Them On Nice And Clean I Suggest Using A Blow Dryer To Heat Them Up And Get Any Excess Water Or Air Bubbles Out. (Ref pic 3) Your Tints. This Would Also Be A Great Time To Paint Your Face Plate Rings.


5. Now You Can Reattach The Face Plates Once They Are All Screwed In You Might Notice Small Air Bubbles Don't Be Alarmed They Will Disappear With Some Heat And Time.If Not You Can Poke Them With A Small Needle And Use A Blow Dryer On Them To Get It Out. (Ref Pic 4)


6. Do Your Final Clean Up. Decide If You Want To Use Old Bulbs Or New Brighter Bulbs And Reinstall The Tail Light Fixture Once Again Be Careful Pushing The Plastic Pins Into The Grommets (Ref pic 5)


7. Sit Back And Enjoy Your Hard Work (Ref Pic 6)


D.I.Y. - ZZP Gauge Pod & Glow Shift Gauges - By Richard DeFries

D.I.Y - ZZP Gauge Pod & Glow Shift Gauges

1. Gather Your Tools / Parts - 1 Yellow / 1 Red / 1 Black Spool Of 18 Gauge Wire - Electrical Tape - Screw Drivers - 13 MM Socket - 3/8 Drive Ratchet - Extension - Flathead Screwdriver - Wire Snips - Wire Stripper - Wire Coat Hanger - 2 Expandable Circuit Fuses - Multiple Wire Connectors - Wire Coat Hanger - Vacuum Fittings - Zip Ties - ZZP Gauge Pod - 2 Gauges Of Choice

2. Start By Prying With Your Fingers From The Pockets On The Side Of Your Vents To Remove The Face Plate (Ref Pic 1)


3. Once Removed Push The 2 Tabs Right Over Vents To Help Release The Upper Tray And Remove The Last 4 Tabs By Gently Pulling Up (Ref Pic 2)


4. Remove The 4 Clips From Stock Pocket And Put Onto The ZZP Gauge Pod - Test Fit Your ZZP Gauge Pod (Ref Pic 3)


5. Remove The Key Fob Sensor From The Bottom Of The Stock Pocket And Attach It To Your New ZZP Gauge Pod

6. Fit Your Gauges Into You ZZP Gauge Pod 

7. For Interior Electrical Wiring Start By Cutting About 5 ft Lengths Of Your Wire In Each Color .  Also Cut 2 - 4 To 6 Inch Lengths Of Your Colored Wire In Each Color And Using Butt Connectors To Supply Each Gauge With A Power / Ground Source . You Should Have 1 Black Wire With A Butt Connector With  2 Shorter Black Wires In A Y Configuration. This Will Be Repeated For Each Wire Color

8.For Most Gauge Types This Will Be Your Wiring Color Code :
Yellow: 12v Constant Source (+) (Un-Switched)
Black: Vehicle Ground ( - ) 
Red: 12v Ignition Source (+) (switched) 
Orange: 12v Switched Headlamp Source (+) (optional)

9. Connect Each Color Of Your Wire To Its Respective Color To The Wiring From Your Gauge. And Start By Passing It Through The Small Hole Above The Vents Then Using A Wire Coat Hanger With A Zip Tie To Pass It Through Your Dash To The Drivers Side Foot Area And Zip Tie It Up And Work Your Way Toward The Fuse Panel Also Located Near The Drivers Side Foots Area Near The Door

10. With Your Expandable Circuit Fuses Your Constant Power Source (Yellow) Will Be A 10 Amp Fuse For Your Tail Gate. For Your Switched Power Source (Red) It Will Be Your Spare 10 Amp Fuse

11. Pop Off The Side Panel Off Your Dash Next To The Drivers Side Door. This Panel Is A Pain In The Ass To Get Off / On And Pulling Off Part Of Your Door Seal Is Needed And Remove The Panel. Remove The 13 MM Bolt On Your Dash Frame Then Place Your Ground On That Bolt 

12. Once That's Completed If Your Running A Boost Gauge You Will Run Your Vacuum Line Down The Same Path As You Did Your Wiring Use A Flathead Screwdriver To Punch A Hole In The Large Rubber Grommet Located Near The Driver Side Floor Panel - Your Cars Main Wiring Harness Is Going Through It So Be Careful. Once Under The Hood With Your Vacuum Line Chase The Wiring Loom Under Your Windshield Wiper Cowl.

13. On The Left Hand Side On The 1.4 T Engine You Will Have Another Wiring Loom Under That Loom There Will Be A Hard Vacuum Line You Will Need To Tap Into That Line For The Boost Gauge (Ref Pic 4)


14. Once That's Completed See If Everything Works And Lights Up Start By Doing Your Final Wire Tuck And Clean Up Remember To Hook Up The Key Fob Sensor On The Underside Of Your ZZP Gauge Pod

13. Push All The Clips Into Place On Your ZZP Gauge Pod And Make Sure The 2 Front Clips Over The Vents Are All The Way Down Then Install Your Face Plate. Sit Back And Enjoy Your Hard Work (Ref Pic 5 & 6)


Wednesday, June 24, 2015

D.I.Y. - Plasti Dipping Wheels / Rims - By Richard DeFries

D.I.Y. - Plasti Dipping Wheels / Rims

1. Gather Your Tools - Jack - Jack Stands 2 Or 4 - 1/2 Drive Ratchet - Breaker Bar - Impact - 19 MM Socket - Degreaser / Cleaner - Index Cards - Plasti Dip Of Choice - Rags

2. Park Your Car . Engage Your Parking Brake / E - Brake . Chuck Your Rear Wheels . ! Safety First !

3.. If You Have 2 Jack Stands Start From The Front And Remove Both Front Wheels / Rims - If You Have 4 Jack Stands Remove All Wheels / Rims (19 MM Socket) Either Use Impact Or 1/2 Drive Ratchet And Breaker Bar

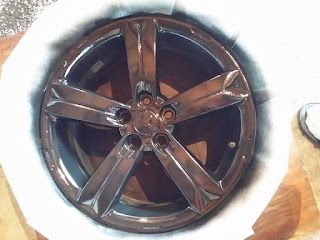
4. Prep Your Plasti Dip Surface And Clean With a Degreaser / Cleaner And Allow Time To Dry (Ref Pic 1) 

 
5. After Prep And Dry - Insert Index Cards Or Whatever You Can Place Between Wheel / Rim And Tires To Prevent Over Spray (Ref Pic 2)


4. Start Spraying Your Plasti Dip Don't Be Afraid If You Mess Up Its Removable - Don't Be Stingy 4 - 5 Coats Recommended (Ref Pic 3)


5. Allow About 30 Mins To Dry Then Remove Your Index Cards Or Whatever Material You Used To Keep Plasti Dip Off The Tires

6. 
10. Install Wheels / Rims (19 MM Socket). Lift Car Up Remove Jack Stands Set Your Car Back On The Ground And Sit Back And Enjoy Your Hard Work (Ref pic 4)


D.I.Y - Painting Brake Calipers - By Richard DeFries

D.I.Y. - Painting Brake Calipers 

1. Gather Your Tools - Jack - Jack Stands 2 Or 4 - 3/8 Drive Ratchet - 1/2 Drive Ratchet - Breaker Bar - Impact - 19 MM Socket - 10 MM Socket - Brake Cleaner / Degreaser - Sandpaper 100 - 300 Grit - Paint Of Choice - Clear Of Choice - Primer Of Choice - Brake Grease - Masking Material - Tape - Rags

2. Park Your Car . Engage Your Parking Brake / E - Brake . Chuck Your Rear Wheels . ! Safety First !

3.. If You Have 2 Jack Stands Start From The Front And Remove Both Front Wheels / Rims - If You Have 4 Jack Stands Remove All Wheels / Rims (19 MM Socket) Either Use Impact Or 1/2 Drive Ratchet And Breaker Bar

4. Remove Caliper (10 MM Socket) Also Remove Brake Pads And Brake Pad Guide Clips (Ref Pic 1)


5. Mask Off Anything You Don't Want Paint On With You Masking Material (Brown Paper Bag / Newspaper) Use A Bit Of Tape To Hold It In Place Till Your Finished And Now Prep The Area You Are Getting Ready To Paint Sand The Calipers And Mounting Bracket Just A Bit To Help The Paint Adhere (Sandpaper 100 - 300 Grit) Once Your Finished Sanding Go Ahead And Spray Everything Off And Wipe It Down Well (Brake Cleaner / Degreaser - Rag) (Ref Pic 2)


6, At This Time Partially Assemble The Caliper Hand Tighten The 2 - 10 MM Bolts

( IF YOUR USING SPRAY CANS SHAKE THEM VERY WELL BEFORE PAINTING )

7. If You Chose To Do Primer (I Did Not... Regret it Now) Apply Your Primer Now Spray In Nice Even Layers About 6 - 8 Inches Away

8.. Start Spraying Your Desired Color Spray In Nice Even Layers About 6 - 8 Inches Away And Clear Coat If Needed (Lighter Colors I Would Highly Recommend) (Ref Pic 3)


9. Allow Time To Dry - Remove The Hand Tightened 2 10 MM Bolt Holding The Caliper In Place - Unmask - Reinstall Brake Pad Guides (Grease While You Have Them Off) Reinstall Pads And Put Caliper Back On (10 MM Socket)

10. Install Wheels / Rims (19 MM Socket). Lift Car Up Remove Jack Stands Set Your Car Back On The Ground And Sit Back And Enjoy Your Hard Work (Ref pic 4)


Tuesday, June 23, 2015

Official Gamma II Instagram and Twitter

Anthony Wibberg will be running the Instagram page. @Gamma_II
Allen Payne will be running the Twitter page. @GammaII

<<<<You can get to them by clicking the social icons below the menu on the left.

Gamma II Sticker NOW AVAILABLE

JMP VINYLS w/ James Palmer is taking over the Sticker Endeavor to be able to offer you more designs, colors, & sizing!

<<<Click JMP Vinyls, Click on GammaII.


GAMMA II Site Cards


How to get/make them

1. Go to the link below and download the front and back PDF


2. Goto Walmart and buy the following (or you can do it on blank paper if you don't want actual cards)


     NOTE: doesn't have to be the matte ivory ones i just picked that link cause it had 10 cards per page, thats the key part. Walmart sells a white 10 cards per page 100 count for less than 4$

3. Open PDF front and print on above card stock. flip the page over and put it back in your printer.


4. Open PDF Back and print on the above flipped over page.


end result after breaking the perferation should be a two sided site cards.

End Results:


Keeping Your Mod's Warranty Intact - Magnuson-Moss Warranty Act

We have seen a lot of questions recently on mods and warranties... Most of us will bring up the Magnuson-Moss Act, but no one really goes into detail... Knowledge is power, So here is a article I pulled up from google that really breaks it down and makes it easy for the average john\jane doe to understand. I'm going to bold points I feel are necessary to know.


Keeping Your Mod's Warranty Intact
You'll often hear this myth regarding hacking or modding your car: it automatically cancels your warranty. Don't believe it as gospel. Sure, changing the windshield wiper blades can't cause the transmission to break, but your warranty won't allow you to do whatever you want to your car.

Warranty requirements

When it comes to new car warranties, automotive owners and enthusiasts have a very important lobbying body on their side, namely SEMA (the Specialty Equipment Market Association). SEMA represents the aftermarket manufacturers, wholesalers, retailers, and distributors in North America. Because this association of aftermarket parts suppliers has a vested interest in the continued sale of aftermarket parts, it has helped to keep new car manufacturers in check by successfully lobbying for legislation that prevents new car dealership service providers from denying warranty coverage, for example in a seized motor, because you chose to use those snazzy aftermarket carbon fiber windshield wipers instead of the OEM (Original Equipment Manufacturer) parts sold through their parts/service departments.

Magnuson-Moss Warranty Act


The relevant legislation here, the Magnuson-Moss Warranty - Federal Trade Commission Improvement Act of 1975, protects consumers from being wrongfully denied warranty coverage by new car dealers.

The Magnuson-Moss Warranty Act states, in part, in Title 15, United States Code, Section 2302, subdivision (c):

No warrantor of a consumer product may condition his written or implied warranty of such product on the consumer's using, in connection with such product, any article or service (other than article or service provided without charge under the terms of the warranty) which is identified by brand, trade, or corporate name; except that the prohibition of this subsection may be waived by the [Federal Trade] Commission if —

(1) the warrantor satisfies the Commission that the warranted product will function properly only if the article or service so identified is used in connection with the warranted product, and

(2) the Commission finds that such a waiver is in the public interest. The Commission shall identify in the Federal Register, and permit public comment on, all applications for waiver of the prohibition of this subsection, and shall publish in the Federal Register its disposition of any such application, including the reasons therefore.

Under this federal statute, a manufacturer who issues a warranty on your motor vehicle is prohibited from requiring you to use a service or maintenance item, unless such item is provided, free of charge, under your warranty or unless the Federal Trade Commission (FTC) waives this prohibition against the manufacturer.


Further, under the act, aftermarket equipment that improves performance does not automatically void a vehicle manufacturer's original warranty, unless the warranty clearly states the addition of aftermarket equipment automatically voids your vehicle's warranty, or if it can be proven that the aftermarket device is the direct cause of the failure.

Specifically, the rules and regulations adopted by the FTC to govern the interpretation and enforcement of the Magnuson-Moss Warranty Act are set forth in the Code of Federal Regulations, Title 16 - Commercial Practices, Chapter I - Federal Trade Commission, Subchapter G - Rules, Regulations, Statements and Interpretations under the Magnuson-Moss Warranty Act, Part 700 - Interpretations under the Magnuson-Moss Warranty Act. Contained within these rules and regulations is Section 700.10, which states:

No warrantor may condition the continued validity of a warranty on the use of only authorized repair service and/or authorized replacement parts for non-warranty service and maintenance. For example, provisions such as, "This warranty is void if service is performed by anyone other than an authorized 'ABC' dealer and all replacement parts must be genuine 'ABC' parts," and the like, are prohibited where the service or parts are not covered by the warranty. These provisions violate the Act in two ways. First, they violate the section 102(c) ban against tying arrangements. Second, such provisions are deceptive under section 110 of the Act, because a warrantor cannot, as a matter of law, avoid liability under a written warranty where a defect is unrelated to the use by a consumer of "unauthorized" articles or service. This does not preclude a warrantor from expressly excluding liability for defects or damage caused by such "unauthorized" articles or service; nor does it preclude the warrantor from denying liability where the warrantor can demonstrate that the defect or damage was so caused.

Under the Magnuson-Moss Act, a dealer must prove, not just vocalize, that aftermarket equipment caused the need for repairs before it can deny warranty coverage. If the dealer cannot prove such a claim — or it proffers a questionable explanation — it is your legal right to demand compliance with the warranty. The Federal Trade Commission administers the Magnuson-Moss Act and monitors compliance with warranty law.

That being said, if you choose to modify your car, and suddenly the fancy new electronic control boxes that you added to your car make it run rough, not start when cold, or buck like a bronco, the dealer can and will charge a diagnostic fee to find out what is wrong with your car. If it turns out that your modifications are the cause of the problem, the dealer has every right not only to charge you for the diagnosis and repair, but to also void the portion of the warranty that has been compromised by the use of those aftermarket parts. Likewise, a dealer may refuse to service your car if it is adorned with aftermarket parts to the extent that its technicians cannot reasonably be expected to diagnose what is wrong with your car. As an example, all cars manufactured after 1994 are equipped with OBDII (On Board Diagnostics II) ports that dealers use to read engine diagnostic codes for everything from an engine vacuum leak to a malfunctioning emissions system. If your chosen modification has compromised the dealer service center's ability to scan for these codes (aftermarket ECUs generally do not support OBDII), then there is a strong probability that the dealer service center will

-Deny warranty coverage
-Refuse to service the car
-Note with your factory field representative for your region/district that your car has been "modified"
--Your car's manufacturer notes are your car's "permanent record." Above all else, avoid compromising these notes. This is nearly always connected with your vehicles' VIN (Vehicle Identification Number) and will
-Ensure that your car will not have its warranty honored at any dealer service center in your area.
-Dramatically reduce the resale and/or trade-in value of your car.

Event participation

Some recent controversy surrounds car manufacturers' monitoring of SCCA (Sports Car Club of America) and NHRA (National Hot Rod Association) events and noting license plates and VINs as a justification for denying warranty coverage and either voiding out the warranty, or placing it on "restricted" status.

The legality of these tactics by automobile manufacturers, in particular where the car is marketed with SCCA membership or literature or advertised in race-modified form, is questionable. To protect yourself, be aware of this trend and take the appropriate precautions in listing critical identifying information when participating in regional autocrosses, tracks days, and drag races.

If you believe that your warranty has been wrongly canceled or placed on restriction either because of modifications made to your car, or because of your membership in, affiliation with, or participating in sanctioned club events or gatherings, consult with an attorney and use SEMA as a resource to fight the denial of coverage.

When it comes to legality and warranty concerns, neither proceed based solely on slick advertising and marketing by parts manufacturers and resellers, nor allow yourself to be cowed into paranoia. Information is power, and knowing your rights and obligations is the foundation to any thoughtfully modified car.

Coming Soon...

We needed a place that we could add content and it be permanent for things like DIY/How-To, FAQ's. Anything really that we need to easily find. I will be adding authors for content ASAP.  Please contact me via the FB page if your interested in becoming an author for this blog.

More than likely we will be moving the Dyno File, and 1/8, 1/4 mile list to this as well.

-Ryan